Showing posts with label round up. Show all posts

Thursday, April 30, 2009

clearing the closet clutter


Can anyone relate to the mess that can happen in a closet...in a matter of months or sometimes even weeks? I'm sure it has something to do with the idea of how you can just close the doors to close out the mess. I feel like I do a decent job of having an organized plan and then in the rush of the moment I end up shoving something in the closet "just for now" and then never coming back to actually put it away in its proper place. And, then, of course, it starts to build! To say the least my kids' closets were in need of some shapening up. They were starting to get overtaken by clothes that didn't fit or new summer clothes I've recently purchased, or simply just stuff that starts to accumulate without you even realizing it!

It was time...so, add a little Spring Cleaning Fever and a good old fashioned Org Junkie Roundup and those closets are now good to go! Clothes are now neatly put away or passed down to friends whose children are in need of the next size. And I even filled a pretty good sized box to either store in the attic or put in the garage sale pile. It feels good to get things organized and clean.

I tackled my son's closet a week ago, so this might be a repeat for those who come by my blog often. For those coming over from Org Junkie's Round Up you can visit HERE for more details. (I even cleaned out the dresser drawers!) I cleaned out my daughter's closet at the end of last week. And, now I can share my success!

Austin's Closet

BEFORE
(right side)

AFTER
(right side)
BEFORE
(left side)
AFTER
(left side)
**************************************

Mikayla's Closet

BEFORE
(left side)

AFTER
(left side)

BEFORE
(right side)
AFTER
(right side)
You still have time...get those closets or cupboards de-cluttered and head on over to The Organizing Junkie to show off your hard work!!

Saturday, February 28, 2009

recipe round-up!

How a month can go by so quickly, I'm not sure, but it's the end of February already and The Organizing Junkie is rounding up all those cluttered spaces. February's task was geting our recipes organized!

If you've visited here before you may have already seen my recipe box tackle I accomplished at the end of January (before I realized it would be part of the Org Junkie's round ups!), along with my dessert book I put together after tackling my recipe box.


Although it felt good to finally be on top of my recipe organization, I was still lacking in the area of getting my cookbooks organized...or even usable! My cookbooks were shoved on the top of a cupboard that I usually don't open or even attempt to reach.


I took all of the cookbooks down and took an inventory of them to see what I know I would use and what I wouldn't.


These are the cookbooks and random papers I found that I decided to get rid of. I even found warranty papers for some of my appliances in all of the mess!


I had debated on whether or not to get rid of these Season's Best Pampered Chef cookbooks since I barely look at them, but instead I decided to flip through them real quick to see if there were recipes that I might like to make and put a flag on the pages I wanted to use.


I also found four kid cookbooks that I haven't used yet because I forgot about them! My daughter is at the perfect age for wanting to help cook, and these cookbooks looked like so much fun! Mikayla got the Sesame Street one for Christmas.


In the end, I decided that I wanted to put the cookbooks in a place where I could reach them easily. I also decided to put my recipe box in the same cupboard to clear up a little counter space. So, I rearranged a few cupboards, and found some room that would work perfectly! Why hadn't I done this earlier?


It feels great to get this accomplished, and now I have less of an excuse not to participate in Menu Plan Mondays.

**Head on over to The Organizing Junkie for more Recipe Round-Ups!

********************************************

In all my organizing madness I came across a fun recipe that I tried out with Mikayla in the midst of all my organizing. See the recipe and all the fun we had here!

Saturday, January 31, 2009

it's round up time!

It's the end of January and The Org Junkie is ready to round up those disorganized spaces. This year she is focusing on smaller areas of the home instead of entire rooms.

January's "challenge" (as I like to call it), was the filing cabinet. And, oh baby, was this a good one!

There were two main problems I wanted to get figured out to make this area a little more user friendly and pleasing to the eye (even though no one else sees it on a regular basis since we keep it in our bedroom).

Problem #1:
I'm a label making freak, so my files were already labeled, but the issue was that the two drawers we had were stuffed full of who knows how many years of what, and a whole bunch of other stuff that I wonder if we ever look at.

To make some room, I did some purging of things that I knew I wouldn't need anymore. I also took out all of the household kinds of things (paperwork for appliances, etc.), along with the HUGE folder of tax information all the way back to 2003 and filed them away in a smaller filing box we had already been using for even more stuff (which was also a mess!).

**Added bonus tip** I ended up putting all of the files that hold the receipts for the bills we pay on a monthly basis, since these are the things I file the most. I wanted them all grouped together because I was tired of searching for them since they were all spread out because everything is alphabetical order. Wish I would have done this a long time ago!

BEFORE - filing cabinet (top drawer)

AFTER - filing cabinet (top drawer)

BEFORE - small filing box
I ended up throwing away half of this stuff, thank goodness!
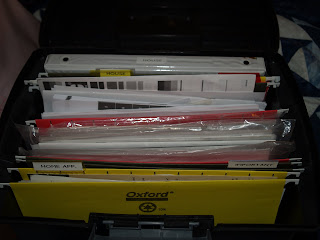
AFTER - small filing box
includes information for our van, tax information from years past
and all household information (indoors and outdoors)


Problem #2:
The biggest problem I have with the filing cabinet area is that I don't have a good system to file papers away in an organized fashion. Therefore, many times it looks like the picture below. Piles of papers, and random things to put away. It stresses me out to see piles, but yet it keeps piling time and time again. I knew I needed some kind of system to help me not have to deal with the filing right away if I was busy, but yet avoid the piles.

BEFORE - filing cabinet area
this isn't even at its worst!

I found this wire filing basket that I had already purchased in our computer armoire in the living room. I hadn't been using it for anything special other than a place to put papers out of the way, but I knew I could make better use of it in this area instead.

I made a couple of files to start with and as I go along, I may find other things that I might need to add. The two files I have are 1) 2008 tax information, so that whenever we receive something we need for filing our taxes, we can just plop it in the folder, and 2) "to be filed" papers, so instead of letting things that need to be filed stack up and be in the way, I'll just slip them in the folder and they're all together for the day I decide to file them in the large cabinet. There is also a space in the wire organizer for magazines.

The small black organizer is for my husband to put all of his receipts and various notes he finds in his pocket, car, etc. That way they're not just floating around everywhere and he knows (and I know) right where to get them if we need them.

And, of course, nothing feels complete without a picture to spruce up the space. This is my husband and I snorkeling in Hawaii on our honeymoon.

Nothing like seeing a clean, organized space and dreaming of vacation, right?

AFTER - filing cabinet area
Although these were small changes, they were necessary changes and I look forward to being able to keep a clean area not only here, but also on the dresser next to the cabinet. Oftentimes all the stuff would spill onto the dresser, and it was not pretty. It's been almost a week since I've finished this project (I did it in two phases), and there is yet to be clutter in sight. That's a success if you ask me!

For more filing cabinet transformations, visit The Organizing Junkie's January Round Up.


Friday, October 31, 2008

time to round it up! the crafty edition...

It's the end of the month and guess what that means?? Time to round up the spaces that we have been working hard on organizing and share what we have accomplished over at The Organizing Junkie. For the month of October we were encouraged and inspired to organize our craft/sewing space. Now, I don't sew, but I certainly love me some craftiness! So, you bet I was on board to make my space just a little more user friendly and a little more cute!

This roundup couldn't have come at a better time since we just recently redecorated our bonus room where my "crafty corner" is located (I share my space with my children's play space).

I can't wait to show you what I have done...

The true BEFORE...in all its ugliness (mess included)
**This picture was taken before we repainted the walls and before I got my new desk. We had used this desk as our computer desk for awhile and I thought I might like it for my craft space because there was so much vertical space to put things. It ended up being way too cramped of a work space, but it worked for a year or so.


Here is the second BEFORE picture with my new desk from IKEA! I love my new desk! The minute I saw it at IKEA, I had to have it! It's so cute and clean-looking and well, cute (isn't that the most important?) We haven't yet repainted in this picture, but at this point I couldn't wait to get my desk put together (I mean, for my husband to put the desk together)


Now, here's the official AFTER... with the new paint and the added extra touches!


To give you a little more of an idea of my creative work space, I thought I would share some "up close" pictures of the little organizational touches that I have added.

Up close of the top part of the desk
(I plan on making a scrapbook type page showcasing my two little ones for the large square frame on the wall above the desk..coming later, but hopefully not much later!)

This cute little white shelf has made its rounds in our house and I think it has finally found its home.
(It gives me just a little bit of extra storage that I need since my new desk doesn't have as much as the last one. I found these cute little tin buckets at Target in the Dollar Spot. I plan on Modge Podging (is that a word?) paper over them to cuten them up)


I love this little space right above my work space.
(I found the magnetic strip that holds embellishments at The Container Store and the green strip above, which is also magnetic, and has a pocket to hold things I found at Tuesday Morning on clearance. I think it was only $4.50. I love that the green matches the colors we repainted the room with.)
Here are a couple of little extra storage goodies I have on top of my desk. They are small enough to still give me a good work space.
(If you look closely, you will see a plastic mat on top of the desk that I purchased to save the top of my desk. I highly recommend these to prolong the life of your space!)
This black wheeled storage cart has been around for quite some time and I love how much it holds. It tucks away quite nicely since it doesn't quite have the cuteness factor, but it is definitely functional! (And, yes, my friends, the labels have been there from the beginning!)

Since my new desk was smaller and it didn't have as much space to organize extra things, we had a storage cabinet already in the room behind the french doors that I decided to reorganize and put even more of my crafting stuff. I got rid of all of the non-crafty stuff and found other homes for it. This cupboard has been my lifesaver with extra storage!


While I'm at it, I thought I would share the kids' craft supplies space on the other side behind the french doors. This cabinet is exactly the same as the other one (it has to match, of course!) What I love about these two units is that they have doors, hiding the mess (unlike the bookshelves I was previously using) and you can child-proof them on the outside, so the little ones don't destroy it on a regular basis.


I hope you enjoyed taking a little tour of my creative space! I don't feel like it's completely finished to what I want it to look like, but I figure I'll always be tweaking it to make room for more and to satisfy my need to reorganize.

If you're in the mood for more reorganization, check out my other Org Junkie Monthly Round Ups here and here.

And if you'd like to see some more creative space inspirations, check out The Organizing Junkie's monthly round up.

Next month is laundry rooms! Wanna join me?

Thanks for stopping by and letting me know what you think!

Friday, August 29, 2008

round-up time!

Updated to add on 3/5/09: This post is part of The Masked Mommy's Closet Pow Wow! Head on over for some closet makeover inspiration!


For The Organizing Junkie's August Round-Up, we were challenged to tackle our mudrooms or entryways. Seeing as we don't have a mudroom (oh, how I wish!) and the entryway to our house flows right into our living room, I chose to organize our coat closet.

I chose this space for a few reasons:

1) It was as close to an entryway or mudroom as I could get and I really wanted to participate in this month's roundup! I've gotten the urge to organize lately!
2) I wanted room to hang our guest's coats in the closet, so it was time to weed out all of the ones we don't wear.
3) I was tired of seeing all of the wasted use of space. The more stuff we own, the more room we need, so there had to be a better way!
4) As the kids get older, we hope to be able to play more games as a family, and I didn't want all the games to topple down on us when we wanted to play one.

BEFORE
left side of closet

AFTER
I added a bookshelf and found some other storage items already in the house to help organize the space a little better...the best part - I didn't spend any money to do this!

BEFORE
right side of closet...terrible waste of space

AFTER
after weeding through the coats, I chose to move them to this side of the closet and I stored my husband's guitars under my son's crib to get them out of the way


BEFORE
left side of closet-notice all of my husband's Poker chips!? Is that really necessary?? He says, yes it is.

AFTER
BEFORE
right side of the closet

AFTER

I spent quite a bit of time configuring the game space to make them fit in perfectly. I only got rid of a couple of games. I just couldn't bear to part with some of them...even if we haven't played them in years. We'll see how long this lasts, but our new rule is if you take a game down, you put it back in the EXACT same spot. Now, we just have to start playing more games together!!

The same night, I organized, we got out Connect Four and Mikayla enjoyed "playing" with her daddy, while Austin, with snacks in hand, watched from the sidelines. I can't wait to see more of this family time as the kids grow older.


Catch the organizing bug and visit The Organized Junkie for more August Round-Up participants and see how others have re-organized their spaces!

Saturday, August 2, 2008

bathroom beautification

4/1/09 - Updated to add: This post is part of Masked Mommy's Cupboard Pow Wow! Check out all the cupboard transformations by clicking on the Pow Wow button to the left.

Not too long ago, I happened upon a site called the Organizing Junkie. Much to my excitement, just as the name suggested, it was full of all things organizing! The author, Laura, who considers herself "the resident freak with a crazy passion for organizing" shares her thoughts and ideas on organizing...and for anyone who knows me well, you know I am an organizing "freak" as well, so I felt like I hit the jackpot of all sites!

Each month, she calls out to all those organizing junkies and wannabes who wish to stay on top of organizing the home (office, car, life, etc.) and designates an area of the house for her readers to get organized. This is known as "Org Junkie's Monthly Organizing Round-Up". I'm never one to turn down a challenge (especially when it comes to being able to use or buy any organizing goodies), so I gladly participated in July's "Round-Up"...the bathroom! I decided to tackle that unseen, but unsightly "under the sink" area of the "master" bathroom (which, by the way, is anything far from being a master bathroom, more like a tiny getaway) and beautify it as best I could. Then I thought while I was at it, I might as well rearrange the drawers and deep clean the whole bathroom (these are the times I'm thankful it IS small). So, thanks Org Junkie for helping me get something crossed off my "to do" list and actually have fun doing it. And above all else, I vow to keep it organized and clean for longer than a couple of days (I think I see my husband rolling his eyes now and mouthing "yeah right").

Please note: I am a huge fan of "before and after" pics as you will soon notice in this post.

Under the sink - Before

Under the sink - After


*******************************


Top drawer - Before

Notice the "attempt" at keeping it organized with the compartments?


Top drawer - After

And, yes, I did have labels on the small boxes in the back prior to this. I love my label maker!


*********************************


Middle drawer - Before


Middle drawer - After


**********************************

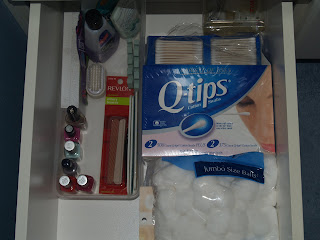
Bottom drawer -Before

Bottom drawer - After

Is it really necessary to have that many q-tips?

*********************************

Bathroom counter - Before

Bathroom counter - After

To see more great bathroom transformations check out Org Junkie's Monthly Round-Up.

 
blog template by yummylolly.com