Friday, October 31, 2008

time to round it up! the crafty edition...

It's the end of the month and guess what that means?? Time to round up the spaces that we have been working hard on organizing and share what we have accomplished over at The Organizing Junkie. For the month of October we were encouraged and inspired to organize our craft/sewing space. Now, I don't sew, but I certainly love me some craftiness! So, you bet I was on board to make my space just a little more user friendly and a little more cute!

This roundup couldn't have come at a better time since we just recently redecorated our bonus room where my "crafty corner" is located (I share my space with my children's play space).

I can't wait to show you what I have done...

The true BEFORE...in all its ugliness (mess included)
**This picture was taken before we repainted the walls and before I got my new desk. We had used this desk as our computer desk for awhile and I thought I might like it for my craft space because there was so much vertical space to put things. It ended up being way too cramped of a work space, but it worked for a year or so.


Here is the second BEFORE picture with my new desk from IKEA! I love my new desk! The minute I saw it at IKEA, I had to have it! It's so cute and clean-looking and well, cute (isn't that the most important?) We haven't yet repainted in this picture, but at this point I couldn't wait to get my desk put together (I mean, for my husband to put the desk together)


Now, here's the official AFTER... with the new paint and the added extra touches!


To give you a little more of an idea of my creative work space, I thought I would share some "up close" pictures of the little organizational touches that I have added.

Up close of the top part of the desk
(I plan on making a scrapbook type page showcasing my two little ones for the large square frame on the wall above the desk..coming later, but hopefully not much later!)

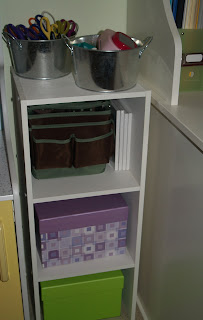
This cute little white shelf has made its rounds in our house and I think it has finally found its home.
(It gives me just a little bit of extra storage that I need since my new desk doesn't have as much as the last one. I found these cute little tin buckets at Target in the Dollar Spot. I plan on Modge Podging (is that a word?) paper over them to cuten them up)

I love this little space right above my work space.
(I found the magnetic strip that holds embellishments at The Container Store and the green strip above, which is also magnetic, and has a pocket to hold things I found at Tuesday Morning on clearance. I think it was only $4.50. I love that the green matches the colors we repainted the room with.)
Here are a couple of little extra storage goodies I have on top of my desk. They are small enough to still give me a good work space.
(If you look closely, you will see a plastic mat on top of the desk that I purchased to save the top of my desk. I highly recommend these to prolong the life of your space!)
This black wheeled storage cart has been around for quite some time and I love how much it holds. It tucks away quite nicely since it doesn't quite have the cuteness factor, but it is definitely functional! (And, yes, my friends, the labels have been there from the beginning!)

Since my new desk was smaller and it didn't have as much space to organize extra things, we had a storage cabinet already in the room behind the french doors that I decided to reorganize and put even more of my crafting stuff. I got rid of all of the non-crafty stuff and found other homes for it. This cupboard has been my lifesaver with extra storage!


While I'm at it, I thought I would share the kids' craft supplies space on the other side behind the french doors. This cabinet is exactly the same as the other one (it has to match, of course!) What I love about these two units is that they have doors, hiding the mess (unlike the bookshelves I was previously using) and you can child-proof them on the outside, so the little ones don't destroy it on a regular basis.


I hope you enjoyed taking a little tour of my creative space! I don't feel like it's completely finished to what I want it to look like, but I figure I'll always be tweaking it to make room for more and to satisfy my need to reorganize.

If you're in the mood for more reorganization, check out my other Org Junkie Monthly Round Ups here and here.

And if you'd like to see some more creative space inspirations, check out The Organizing Junkie's monthly round up.

Next month is laundry rooms! Wanna join me?

Thanks for stopping by and letting me know what you think!

fun find friday - more fall decor??

So, I thought I was done with my fall decor this year, but when I came across these cute little fabric pumpkins at JoAnn Fabrics I couldn't resist. They were 60% off!! The two little ones were $1.19 each and the larger one was $1.99. They are a cute addition to the simple decor I try to create in our home during the Fall season.

For more of my FUN FIND FRIDAYS, check them out here.

Thursday, October 30, 2008

straight from Pixie Hollow

Ryan and I did something that we usually never do...

...we bought a new release Disney movie. Usually we rent them for $.99 or borrow them from friends. We actually don't watch that many movies. Honestly. I did buy Madagascar when it was on sale for $10 during the summer (which I think is such a cute movie and can't wait until Madagascar 2 comes to the theaters!) Hello, rambling, now back to the new movie...


For Halloween this year we had planned on Mikayla being Tinkerbell. For Mikayla's 2nd birthday, she was given Tinkerbell wings, a crown, a wand, and an outfit from her Uncle Eric & Aunt Kristen. Unfortunately, Mikayla is a little above average for a 2-year old, so she quickly grew out of the outfit. Thankfully, my friend Sarah's daughter had been Tinkerbell in one of her dance recitals when she was around Mikayla's age, so she had a costume for us to borrow! I couldn't believe how well the outfit all came together and for free! So, what do we do to celebrate? Spend the money we saved on the costume to buy the movie. On sale, of course.

Mikayla got to watch the movie today and I tried to make it into a special deal. She bought into it because you should have seen her checking out the DVD case and how excited she was. At different points throughout the movie, she would say, "thank you, mommy, for the special movie". Do I have a sweet girl or what? After watching the movie, I think she is even more excited to be Tinkerbell at Halloween...or am I the one who is more excited?

Being very curious about this "special" movie

She has to have her special blankie and dolly to watch her special movie
Tomorrow night should be fun. I plan on trying to make Mikayla look a bit more like Tinkerbell than the last time I had the kids dress up in their costumes. (We'll see if we can get her to forego the rubber boots.) Her hair is long enough for a cute little bun on the top of her head and I can't wait to add just a little bit more to make her have extra rosy cheeks. Ah, to have a girl to dress up!

Our sweet Tinkerbell down on the farm

Oh, and in case you're wondering, our "little monkey" Austin is going to be... a little monkey. It wouldn't make sense any other way! I'm serious.

a little conversation never hurt

I have the privilege of being the creative activities leader for our local MOPS group (Mothers of Preschoolers). For the month of October, our topic was parenting, so for the craft I decided to have the moms decorate containers for the purpose of holding dinner conversation starters on slips of paper. I purchased a variety of rub-ons, stickers, and ribbon for the moms to embellish their containers and get creative! They really enjoyed it and many of them have even shared that they were going to make more of these for Christmas gifts.

The glass jar I found at IKEA for $1.99 each. I found the rub-ons (10 family-style sayings) at Michaels for $2.99 and of course, there are endless places to find stickers and fun ribbon.

Here is my creation...

FRONT

BACK

I believe that sitting down for a meal at the table is very important (although I'm not naieve enough to know that life is busy and this can not always be a reality every evening). Doing this brings the family together and gives them the opportunity to talk with one another when so often in the busy-ness of our lives, it doesn't always happen. The purpose of the dinner conversation starters is to bring fun, laughter, and communication to the table. (There are also some topics that are meant more for serious conversation, especially with older children.) Because of the ages of the children that our MOPS group activities are geared for, I was able to find a long list of fun questions that could be asked and answered by preschoolers and elementary-aged children.

Below are a list of links that might help you start your own little container of conversation starters and do a little more talking around the table.

Suite 101.com - Dinner Table Conversation Starters
Homebasics - Family Conversation Starters
Stouffer's - Mealtime Conversation Starters
Funplayfulparent.com - Conversation Starters for kids of all ages!
Building Blocks - Conversation Starters


**This cute container can also be used for many other things like potty treats, things you are thankful for, allowance, a good behavior jar...the ideas are endless. What might you use this container for (of course, besides your crafting supplies) in the area of benefiting your children?

Wednesday, October 29, 2008

it's the great pumpkin, and more!

So, call me crazy, but we started yet another tradition for this season that I hope will continue through the years. What can I say, I'm on a roll this year! We've hit the pumpkin patch, carved a pumpkin, played in the leaves, dressed up in costumes, and decorated pumpkin-shaped cookies. After tonight's fun time, I even have one more that I hope to "squeeze in" tomorrow before Halloween is fully upon us.

Tonight, I decided it would be fun to cook up some pizza, make some chocolate chip pumpkin bread and watch "It's the Great Pumpkin, Charlie Brown!" So, despite the headache that came on earlier in the day, I still made it happen. It wasn't all that I had expected, but we have to start somewhere and maybe next year the experience will be a little more enjoyable and there will be less of a need for "damage control" from a mischievous little one year old. It was still a fun time and Mikayla loved it!

And that's what it's all about...

Mixing up some chocolate chip pumpkin bread...
this little girl loves to bake!
(I had to watch out because a couple of times she tried to add a little bit more of ingredients when I wasn't looking. The baking soda and salt being one of them...yuck!)

The recipe made 7 small loaves of bread!
(I'll be sending some to work with Ryan)

Austin wasn't too happy that he didn't get to sit on the blanket on the floor with the rest of us,
but he still enjoyed the cartoon from his highchair


Mikayla entranced by the TV...she really liked Snoopy!

Austin, on the other hand, not so entranced...

Poor sissy! She just wanted to watch the movie...

After bath time, Mikayla got to enjoy her hard work
YUM!


For some craftiness of the season, and a few more new traditions, check it out here.

Tuesday, October 28, 2008

a systematic grocery list works for me!

For this week's Works-for-Me Wednesday, I thought I would share a simple, yet functional tip I recently created for myself to be more on top of the dreaded job of grocery shopping (or should I say the dreaded grocery bill). I'm sure there are better systems that have been created by "pros", but I haven't had time to find one, so here is my own little creation.

Last week, in preparation for a much needed grocery trip (so sorry my little ones for the peanut butter and jelly repeats), I decided to jot down my list by breaking it into categories of things that I might find in the grocery store together. (I've heard of some people even mapping out their favorite grocery store and shopping that way.) I figured this would help my trip move more smoothly and quickly.

My first version was just a bunch of scribble (see below), but I decided that I could benefit from typing up a quick version to save on the computer that I could print off whenever I needed to start a new list.


My plan is to keep this handy on the fridge (probably on the side), so when I run out of something while I'm cooking or baking, I can write it down in the correct category. I'm sure as I continue to use this system, I will find that I may need to add categories or tweak it a little to be more efficient. I have also decided to hang an envelope that will be meant for coupons for things that I already have on the list, so I don't forget to take the coupons with me. I have a coupon organizer that I use often, but sometimes I forget to grab it when I do a quick grocery shopping trip and then realize after getting home that I had a coupon for the items in my bag!


Head on over to Rocks in My Dryer for more of Works-for-Me Wednesday.

**For those interested, next week's Works for Me Wednesday will be a themed edition sharing about toys worth buying. Want to participate? Check it out here.

tackling the kitchen table

With such a busy day and me not feeling 100% (I think I have a bit of a cold), there wasn't much that got tackled completely today. As always, I started many projects, but didn't finish them because of some kind of distraction or another, which is not an uncommon thing in this household! Just ask my patient husband...

I had signed up to deliver dinner for tonight to a gal in my MOPS group who had just had a baby, so I made a batch for our family as well, which always works out well. My big tackle of the day that had the most improvement was clearing off the kitchen table and cleaning up the dining room area (not to mention, getting dinner on the table, too!). Somehow the table becomes the one place (ok, maybe one of the places...) that we tend to pile everything on top of. I feel like I am constantly clearing it off, and today was no different. I try each week to tackle something a little bit bigger on Tuesdays, but for today this will just have to do.

BEFORE
What an eye sore!
(The sad thing is that I have seen it looking worse!)

AFTER

AFTER
Mikayla was obviously ready to tackle dinner tonight!
For more Tuesday tacklers, visit Tackle it Tuesday at 5 Minutes for Mom.

I'm off to go tackle some Target therapy...

talk about new traditions

Halloween is almost here! In our home, we try not to focus on the spookiness of the season, primarily because our children are young and that may not go over well at bedtimes. But we do love us some treats and dressing up is always fun to do!

As the kids get older, I want to start making new traditions for the holidays. This year, I decided to make each of the kids a Halloween "bucket" (for lack of a better term) where I could put little goodies in for them to have on Halloween Day. The concept is pretty much like Easter, but in the Fall! And I plan on telling them that a special guest dropped them off (I'll have to come up with who for another year...maybe a Halloween fairy? You know, the cute, sweet kind...remember nothing spooky!)

I found these cute little orange buckets at Walmart for $1.00 each. The ribbon was only $.97 a spool. I like how the buckets are small, so that way I don't have to find a lot of things to fill them up...


...well, apparently I didn't have any trouble finding things to fill them up. My little goodies didn't quite fit. I'll have to think "smaller in size" next year. I didn't want to give them lots of candy since they will get candy with trick or treating. In Mikayla's bucket she has Dora Halloween stickers, Craisins, pumpkin Pez, and a "dress up" My Little Pony. Austin's bucket is filled with a pumpkin key chain and goldfish crackers. (Shhh... don't tell him he didn't get much this year. Will a 1-year old really notice the difference? I don't think so!)


Onto another tradition...

Last year my in-laws bought Mikayla a Halloween book, "A Pumpkin for Pooh". I thought that this would be a fun tradition where we could get a book every year that we could read at Halloween time. Mikayla is really into Dora these days, so when I saw "Dora's Costume Party" I just had to do it! (Hey, if Dora helps Mikayla brush her teeth than Dora gets a special place in our home...)


And lastly, I couldn't resist decorating trick or treat bags for my kids for all of the Halloween treats to be had in the coming years (which I found on clearance at Target for $1.48 a piece!). The last time I showed these bags, I only had the names painted (stenciled) on, but my mom gave me a great idea to add some cute ribbon to the top. I was thinking about adding more, but she also gave me the idea of adding a little bit each year when I come across something I like. That way, I'm not trying to just "make it work".

**The thing I like best about this picture is that the sign says to RELAX which is perfect at this moment because there is a flaw in the ribbon on Mikayla's bag where it's missing a white dot-right in the front! For me, it stands out like a sore thumb! But I'm reminding myself to RELAX and let it go. (Those of you who know me well will probably guess that sooner or later I WILL rip the ribbon off and put a new one on. I'll try to resist, but I just can't help myself!)

Saturday, October 25, 2008

one bite says it all

On Friday, I decided it was time to make some sugar cookies to deliver to our neighbors. Last year, our treat this time of year was a small loaf of chocolate chip pumpkin bread. This year, I was in the mood to make cookies and figured since my daughter is now at the age where she enjoys being mommy's little helper, I thought it would be perfect. Check out the fun she had at here.

Soft Sugar Cookies

3 3/4 cups all-purpose flour
1 teaspoon baking powder
1/2 teaspoon salt
1 cup margarine, softened
1 1/2 cups white sugar
2 eggs
2 teaspoons vanilla extract

1. Sift flour, baking powder, and salt together, set aside.
2. In a large bowl, cream together margarine and sugar until light and fluffy. Beat in the eggs one at a time, then stir in the vanilla.
3. Gradually blend in the sifted ingredients until fully absorbed. Cover dough and chill for 2 hours.
4. Preheat oven to 400 degrees. Grease cookie sheets.
5. On a clean, floured surface, roll out small portions of chilled dough to 1/4-inch thickness. Cut out shapes using cookie cutters.
6. Bake 6-8 minutes, or until edges are barely brown. Remove from cookie sheets to cool on wire racks.

**This particular recipe (which I can't remember where it came from, but don't worry I won't sell any of the cookies) made just under 4 dozen and I love how soft they turn out after baking. The key is to bake them closer to the 6 minute mark. The other great thing about this recipe is the dough is easy to handle (just use flour on your hands like most sugar cookie recipes) and roll out.

**I started out thinking that *maybe* I could make cookies that looked like this, but then quickly snapped back to reality and so this is as good as it got...


one of my favorite parts, is wrapping them up to deliver

getting ready to deliver the goodies

say it with cookies

In keeping with the festive spirit of the season, we "whipped" up a batch of pumpkin-shaped sugar cookies for our neighbors. One thing I want my children to learn is that it is very important to bless others as often as you can. Sometimes it's just in a smile, a home cooked meal, a little treat, or sending a card. I have always enjoyed the feeling I get from making someone else smile when they least expected it.

Each year, I enjoy making some goodies for our neighbors at various special holidays (the most popular being Fall, Christmas, and Easter). Last year, I made chocolate chip pumpkin bread, but this year I thought since Mikayla was at the age to be my little helper, we would try something where she could have a part, too. And, seriously what 2-year old wouldn't love to decorate cookies with frosting and sprinkles?

Step 1: make the cookie dough
(chill for 2 hours, and then while kids take their naps, bake them in the oven)

Step 2: after nap, frost the cookies

(I have to admit, it was hard not to help her spread it evenly on the cookie...
I'm working on giving up control!)


Step 3: a little frosting taste test

Step 4: time for sprinkles!
Step 5: dig in to some deliciousness!
look at how jealous Austin is because he can't have one...
...but that didn't stop him from trying!
Today, we set off to deliver our goodies to the neighbors. It was so sweet to watch Mikayla get so excited. She is quite a shy little girl (just like her mommy), but she came alive...it's that feeling of blessing others, I'm sure! Only 2 of the 4 neighbors were home, so we had to leave the other 2 on the front step. When we were all done, Mikayla wanted to go deliver some more! That's my girl!

the little elves

Do you take treats to your neighbors? If so, what do you bring and when do you usually do it?

**For the recipe and a snapshot of the final product, check it out here.


.

 
blog template by yummylolly.com