 Update to add: This idea was featured on One Pretty Thing - Daily DIY on April 30th. Click button to the left to see some other projects for that day or click HERE to go to the main page for One Pretty Thing.

Xazmin at This is the Year hosts a monthly get together that showcases projects using Mod Podge, the miracle glue! (Which, by the way is something I am LOVING these days, and therefore I also joined up with Things I Love Thursday at The Diaper Diaries.) Just within the last few months I've really been on a Mod Podge kick, so I knew exactly the project I was going to do for this month. Actually, I wanted to have this project completed weeks ago, but have been lacking in motivation after a few hiccups in my plan, but I was able to get inspired and got it done just in time for Mod Podge Mania!
A little over 2 weeks ago, I shared this fun find from my local Goodwill that I snagged for only $1.99! I had visions of what I might do with it, but those visions quickly got smashed once I had a little run in with a can of spray paint. Don't laugh...I'm just not good with things like that.

Here's my spray paint job. Not the best. For some reason some of the places cracked and bubbled a little, so I decided that I would sand it down and just brush over it with paint later on...seriously, just put down the paint can! I already did enough damage.

Next step was to find some fun paper. I headed to my local scrapbook store with my tray in hand. I found some beautiful coordinating paper that I couldn't wait to bring home!

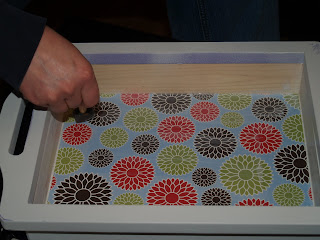
After cutting the paper to size, I glued down the main patterned paper in the bottom of the tray and then added a few coats of Mod Podge over that. (Don't you love my spray paint job? I think I actually forgot this side...good thing I was just going to cover it with paper anyway!)

Then it was time to cut the pieces for the inside walls. Thankfully the length of paper was a perfect fit, leaving just a little of the wood tray exposed on each side but not enough to notice. After measuring, I just cut the paper into strips. After gluing each of the strips on the inside I added a couple of layers of Mod Podge over those as well.

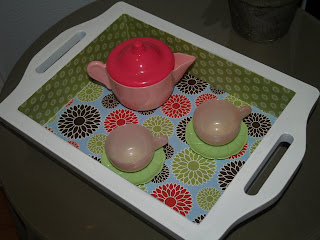
The finished product!
I'm so happy with the colors and patterns of the paper!
I'm glad I didn't just scrounge up something in my paper stash and instead decided to spend the $2.29 to buy the paper just for this project! And I just LOVE how the Mod Podge gives it that finished, glossy look.

So, are you wondering what I plan on using this for? Mostly just for my daughter to play with in her "kitchen". Although as she watched me work on this project, she asked what I was doing and I said I was making her a tray so she could bring me breakfast in bed! We'll see if she passes that idea onto her daddy.

And, now if you've suddenly gotten in the mood to get creative and be inspired, join me NEXT THURSDAY with a craft project that uses anything with ribbons for my Monthly Craft Challenge. Check out all the fun things that were made by many who joined in for February's Challenge & March's Challenge. I'll be sharing some inspiring ideas, so come on back in the next couple of days to take a peek!


36 comments:
Heidi...it's so stinkin' cute - I love it!
That paper is adorable...and I'm lovin' the 3-sided paint job! :)
I bet your daughter is thrilled! Thanks for partying with me!
wow, cute. i want one!
That is so freakin adorable...I can hardly stand it. LOVE that paper! I am a paper and ribbon addict. I need a 12 step program.
~Amanda
That. Is. ADORABLE!!! I love it!
That is just too precious! Now that my daughter is getting more into her kitchen...I'm defintely going to have to do this!
I couldnt wait to keep scrolling to see the finished project. My daughter has that Melissa and Doug tea set.....it came with little purple tea cups and pot.
great job!
What a cool tray!! And you made it just in time for mother's day!! You will at least get breakfast in bed then won't you? :)
Heidi...so stinkin' cute!!! I love it. Feel free to send it my way!:-)
Have a great day! Can't wait to catch up on your posts!
Too cute Heidi! I bet she will be bringing you some pb on a spoon on that tray soon! (That was my 4 year old's idea for breakfast for mom and dad one day.)
That is so cool! I love the paper that you used.
I love this project! I have never tried Modge Podge but love saying the words, they sound so neat. What kind of glue do you use to adhere the paper to the wood? Great paper choices too, very fun!
Your tray is adorable!! Love the paper you choose!!
~Becca
Heidi - What a cute project!!! I love it. And the papers you used are adorable!
Great job!
XOXO
jen
That is so cute! You are so creative. I am sure that Mikayla will have fun with it.
Love,
Mom
I know I've said this before but I MUST try this stuff. I see so many cute things out there. Great tray. I asked Jamison to pass onto her dad that I want a gift cert to my favorite scrapbook store...I hope she does!!!
That is adorable! Great job!
Your tray came out so cute!! I love it. You did a great job and the scrapbook paper is perfect. Love the picture with the tea set on it-I bet your daughter will use it alot. I know my girls would love to have that in their play kitchen.
Heidi, I totally love it!!! I love the paper on the sides. It gives it awesome depth and contrast! Great project!!!
Adorable as always! Love the colors of the paper.
I love it. Good job.
My word verification word is mulet. How funny.
LOOOOOOOOVE THAT!
I HAVE BEEN WANTING TO MOD PODGE AND... NOW I AM INSPIRED!
THANKS!
Heidi, thank you SO much for letting me know my links did not work. I thought I checked them last night, but I was practically falling asleep at my computer desk. I never would have known if you hadn't said anything. THANKS!
~Amanda
That is so cool and you are just so creative! Awesome.
I love that! Great job and thanks for the instructions.
Love the papers! I think my daughter needs one for her play kitchen too!
Stoppin in from over at Mod Podge Mania....... THIS is so cute! Seriously, I am in love!
This is SO CUTE! It would be a perfect little tray to put glasses in next to a pitcher filled with iced tea or lemonade. It looks like summer. :) What a great idea!
That looks awesome! I love it. I finally found some trays at the GW, but I haven't had the guts to decoupage them yet. Great job!
Totally adorable! It is amazing what coordinating papers can do for a project. I love it!
That is DARLING!!!!
Wow Heidi, this is incredible! I love how it's deep so the dishes won't fall out. That's perfect for a three year old. Don't worry, I have serious spray paint issues too!
I LOVE this! It turned out so cute! What a fun tea tray.
I was just thinking today that I better get started on a ribbon project - where does the month go??
WOW! This was featured on One Pretty Thing. So cool!
Love,
Mom
absolutely love it!! Dang, I wish I was crafty :)
Darling!
Oh, I LOVE that!!! Is it tea party time, yet?
Post a Comment